Hello and welcome to my blog!
I am a freelance illustrator, artist and paper crafter. I hope you will set back, have a peek around my blog, check out my archives and enjoy!
I would love it if you would "Follow" me and visit often! :)

Click directly on the green arrow below to hear a quick message from me. :)

Followers


PLEASE CLICK ON THE LINKS BELOW TO VISIT MY OTHER PAGES AND TO GET TO KNOW A LITTLE MORE ABOUT ME. ;)


Some Of My Favorite Creations To Date

Showing posts with label gift. Show all posts

Tuesday, April 8, 2014

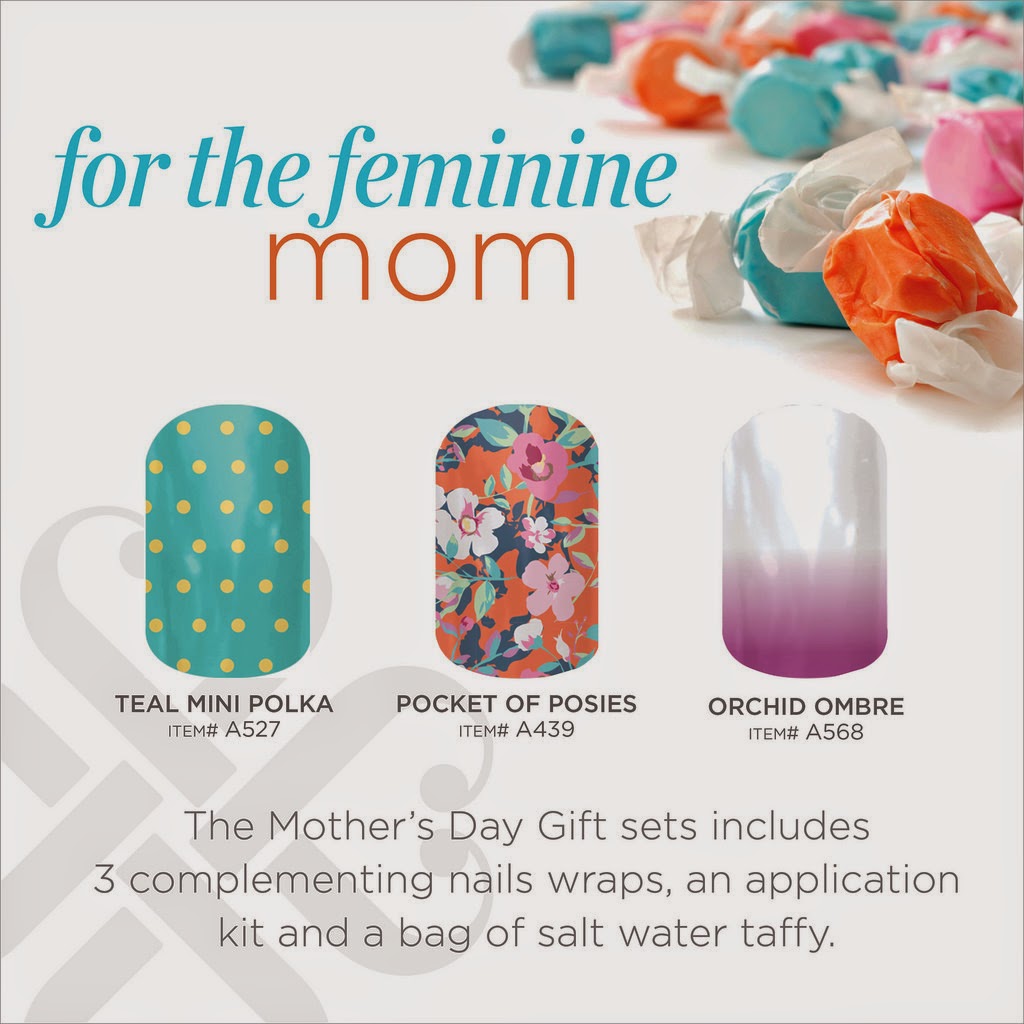
Mother's Day Special From Jamberry!


Hi Everyone!

I wanted to pop in and share an amazing deal with you.
Because of the crazy low price, I can't share that here, but I can give you the link so you can go to the website and check it out.
Jamberry is having a flash, limited quantity sale on some amazing sets. There are 3 styles to choose from:
The each come with 3 designer nail wraps, a manicure set and some amazing fresh salt water taffy!
What a sweet gift for mom (or anyone)!
Head on over to my Jamberry webpage and check it out. 
Hurry! It's a limited time and at this price, they are going fast!:)


http://www.artsyfartsynails.jamberrynails.net/category/mothers-day

What set best fits your mom?
Thanks so much for stopping by!


Wednesday, November 14, 2012

CardMaker Holiday Yummies Blog Hop

 
Hi everyone and welcome to CardMaker magazine's "Holiday Yummies" blog hop!
The girls have all created fun little treat packaging with coordinating cards/tags to share with you today. We though it might give you some gift ideas for those special people in your lives who love to receive home-made goodies or treats.
 
I decided do a gift bag filled with peanut brittle. My little secret is, it's microwave brittle and only takes about 10 minutes from start to finish! You could whip of several gifts in no time flat.

 
To make it gift worthy, I simply used a flat bottom cellophane bag from ClearBags.com, added some My Mind's Eye Signature Christmas Holiday Glitter designer papers for a topper, then created this fun tag with Spellbinder's 2012 Heirloom Ornaments. I embellished the ornament with Ranger Ink's Gold embossing powder and Want2Scrap's White Pearls and Turquoise Rhinestones. The ornament was attached with some pretty Turquoise Organza from Really Reasonable Ribbon. The sentiment was stamped with a "vintage" Stampin' Up set and Ranger's Aquamarine Archival ink.
 
Now, the only question is....who's name shall I put inside? :)

 
I thought I would share my recipe just incase I might have got your mouth watering for peanut brittle. :)

Microwave Peanut Brittle
1 cup sugar
1 1/2 cups raw peanuts
1 teaspoon vanilla
1/4 teaspoon salt
1/2 cup light corn syrup
1 tablespoon butter
1 1/2 teaspoons baking soda

Mix sugar, salt, and syrup in a microwave safe bowl and cook on high for 5 minutes. Working quickly, stir in peanuts, vanilla, and butter. Microwave an additional 1 1/2 minutes. Remove from microwave and stir in baking soda. Quickly pour onto a baking sheet that has been coated with butter or non-stick spray. Cool, break into pieces and enjoy!
 
Make sure and visit the rest of the girls to see what yummy gifts they have to share. :)
 
Brooke

Thanks for hopping by!


Wednesday, September 19, 2012

Welcome to the CardMaker Magazine Blog's Graceful Leaves Blog Hop!


Hi everyone! 
I welcome you to my blog, and another CardMaker hop, as enthusiastically as I welcome the first signs of Fall!
It's my very favorite season. I don't know what I love more...the cool crisp air, the sounds and rich aroma of fallen leaves crunching under my feet, or the beautiful foliage as it turns it's many shades of splendor.
I can't share the feel or the smell of Fall with you but I can share some of the colors of God's paintbrush!

The CardMaker girls have all created cards for you today inspired by Fall leaves to herald in the new season.
Here is mine.


Right now, the leaves on our Flaming Maple are just starting to turn from green to a burt orange color and I tried to capture that on my card since we are celebrating the first day of Autumn. In a few weeks, I will be able to break out with vibrant oranges and unbelievably beautiful reds. :)

Here's a shot of the inside.


This was a fun and simple card to create so I thought I would share some of the creative process with you.

First I stamped the beautiful #9902F "Every Leaf Fluttering" sentiment from Inky Antics onto a 5"x3 3/4" piece of Brilliant White cardstock.
Then I took some leaf dies and cut out stencils from scrap cardstock.  I placed the leaf stencils over my card front and spritzed them with assorted colors of mists.


After I have done all of the leaves, I placed a scalloped circle over the sentiment and misted the entire card front with Perfect Pearls Sunflower Sparkle mist to give the entire card some shimmer and shine.


The leaves I punched out to make my stencils, were still laying on my table, so I thought I would incorporate them into my card as well. I sprayed them with pretty heavily with mists.


I hate wasting all of the mist that is left laying on my non-stick craft mat, so I took a piece of scrap paper and soaked it all up. There were a few white spots on the paper after I turned it over so I added just a bit more mist to fill in the bare spots.


I let all of the pieces dry, used the color matched paper that I created with the left over mist for the second layer of the card, and the trimmed off scrap pieces to accent the inside. Then I add the leaves that had started out as scrap pieces from my stencil making step with foam dots.

This card really just evolved into what it is by me using what I had on hand. I had originally planned on it being a simple white card with a few misted leaves and a bow when I started out :)


~~UPDATE~~
Once again, I used another byproduct for crafting. I had picked some leaves from our Maple tree for the photo shots of my card. They were very pretty and I hated to waste them, so I used some Mod Podge and a canning jar to create a coordinating Fall candle. :)


CARD RECIPE
#9902F "Every Leaf Fluttering" from Inky Antics
Gold Ore Metallic, Brilliant White, and Midnight Black cardstocks from Discount Card Stock
Gold seam binding from Really Reasonable Ribbon
Provo Craft Cuttlebug 2x2 Fall leaf die set
Ranger Ink: Butterscotch and Meadow Color Wash sprays, and Sunflower Sparkle Perfect Pearls Mist.
Mod Podge

Thanks so much for dropping by!
I hope you take time to enjoy the beauty of the ever changing colors of Fall.
I would love to know what your favorite thing about Fall is!  
Pop it in a comment below before you go. :)


Here are the links to the rest of the CardMaker girls blogs so you can hop by and check out the stunning projects they have prepared for your viewing pleasure.

Anya
Carolyn
Colleen
Glenda
Jennie
Kimberly
Brooke (CardMaker blog)


Sunday, September 18, 2011

It's Time For Another Clear Dollar Stamp Blog Hop!!!!

Hi Everyone!

It's time for another Clear Dollar Stamps blog hop!

If you came here from my sweet friend Lisa's blog, you're in the right place! If you just happened onto my blog without knowing about the hop, head on back to Lori's Clearly iStamps blog so you can get in at the beginning. You don't want to miss any of the team's amazing creations, or your chance to win a $25.00 gift certificate from Clear Dollar Stamps!
Our hop today is inspired by these pretty colors.


Just so happens that I created a digital paper pack called "Tangy Trio Leaves" that coordinates perfectly! :)

It is available now for instant download from Clear Dollar Stamps for just $3.50 in your choice of
  8 1/5"x11" or 12"x12" formats.


 I wanted to share a different way to use digi papers. I usually print them out on heavy cardstock but I found some amazing stuff called Matte Presentation Paper. You can find it in most office supply stores. It is very soft and smooth, very opaque white, and perfect for printing and making wrapping paper!


I used one style of my "Tangy Trio Leaves" digi paper pack to print the wrapping paper, another for my home-made roses (made with a really cool rolled rose die) and the third for the leaves.
I'll tell ya how excited I am about those leaves in just a minute. :)

I realize the ribbon isn't quite the color on the inspiration photo but it is a darker shade of the same color family, I have a whole bolt of it, so I went for it!  :)
It's Moss Green Double Faced Satin from Really Reasonable Ribbon and it's GORGE! That's why I ordered a whole bolt! :)


I told you I would share my excitement about those leaves. Well...I was getting ready to punch some leaves from some plain ol' green cardstock, then ink the edges and emboss in some veins, when it hit me.
PUNCH THE LEAVES OUT OF THE PAPER!!!!!
Punch punch punch and done! No inking, no embossing veins, and they look awesome!
I tell ya...honestly, if I hadn't illustrated this paper pack myself, I would purchase it for the leaves alone!!!
I will sooooo be using it for that reason ALL OF THE TIME!!!!  :)
It will work for lots of sizes of punches. Don"t have any?  Cut them out real quick by hand!


The stamp I used is from Clear Dollar Stamp's "Heartfelt Sentiments".
Clear Dollar Stamps also have a Tangy Trio Collection with lots of ribbon, cardstock, Copics and Tombow markers to match!


Look how easy we have made it to coordinate!
If you would like to get a closer look at, or purchase any of the items I have used on this project, please click on the product pictures below this post.

Your next stop on the hop is the ubber talented Cassie's blog.

Remember to leave a comment all all of the girl's blogs to increase your chances of  being  the random commenter the $25.00 gift certificate!  :)

Thanks for hopping by!
Hugs,
True :D

Saturday, July 31, 2010

Fishbowl Candy Jar

Hello,
It's Saturday which means it is my turn to post a Really Reasonable Ribbon's Ramblings project.
I didn't do my normal card thing but instead made a quick little gift jar that would be great to give anyone.


Please watch the video below to see the fish in action and to get all of the detail.


The fish is from I Brake For Digis and is called......you guessed it......"Fish"!  ;)
The beautiful ribbon is Kiwi Organza Dots, and Aqua Organza from Really Reasonable Ribbon. 
The half pearls are also from Really Reasonable Ribbon.

I am entering this project in the following challenges:
Creatalicious ~ Show some 3D
The creation is 3D plus I popped the fin and eyeball on the fish
Creative Inspirations ~ Anything Goes
Digital Tuesday ~ Dazzle Me
I used metallic paint and glitter all over the fish
Creative Inspirations ~ Animals
Does a fish count? ;)
Charisma Cardz ~ Something With a Tail
Check! ;)
Polka Doodles ~ Generic Male & Female
Check! :)
Pile it On ~ Stretch That Plastic!
I used fishing line for my plastic

Thanks so much for dropping by!
Please leave a comment before you go....they make my day!
Hugs,
True :D